

Chapter 3: Test-Driven Rails
在本章節將 Chapter 2 中所撰寫的測試移入在 Rails 的框架下,並利用end-to-end 測試來增加 model testing。
Let’s Write Some Rails
要開啟ㄧ個以測試為驅動的開發過程,了解系統需求是非常重要的。更清楚地說,準確度在剛開始的階段是暫時可以被忽略,但對系統需求必須有基本概念才能開始測試。以書中的專案例子來說,可以列出幾個地方來著手撰寫測試:
- A user can enter a task, associate it with a project, and also see it on the project page.
- A user can create a project and seed it with initial tasks using the somewhat contrived syntax of task name:size.
- A user can change a task’s state to mark it as done.
- A project can display its progress and status using the date projection you created in the last chapter.
“Any new logic should be driven by failing test “― Rails 5 Test Prescriptions ―
End-to-End Testing
Outside-in testing: 使用 end-to-end test 來定義功能(outside),在逐漸增加ㄧ系列的單元測試為動力來驅動內部的程式碼撰寫及設計(inside)。
Capybara:提供在測試中可以描述 『document object model (DOM)』,以及『使用者與網頁功能的互動』,進而幫助我們在撰寫 end-to-end test 時會更加簡易和輕鬆。
接著依書中指示來改寫兩個設定:
- 在 rails_helper 檔案中,把以下註解拿掉
Dir[Rails.root.join("spec/support/**/*.rb")].each { |f| require f }這會讓 RSpec 在 spec/support 做自動讀取的行為。
- 在 spec/support/system.rb 新增程式碼如下:
RSpec.configure do |config|
   config.before(:each, type: :system) do
     driven_by :rack_test
  end
end
這會告訴 RSpec 要使用 Capybara 所提供的 rack_test 工具,即使沒有使用 Javascript,也可以模擬 browser DOM tree。
要撰寫測試之前,先構思這個測試需要什麼?:
- Given: (What data does the test need?)
- You’re starting with empty data, so no setup
- When: (What action is taking place?)
- Filing out a form with project data and submitting
- Then: (What behavior do I need to specify)
- Verifying that the new project shows up on your list of projects with the entered tasks attached.
以下的測試之所以會取名為 “outside test” 是因為它是在 Rails 以外運行並定義其功能。基本上是模擬『使用者行為』、『瀏覽器的請求』和利用 HTML 來評估『瀏覽器的反應』。 這樣的測試型態是獨立於你的程式碼結構。
新增ㄧ個 end-to-end 測試:
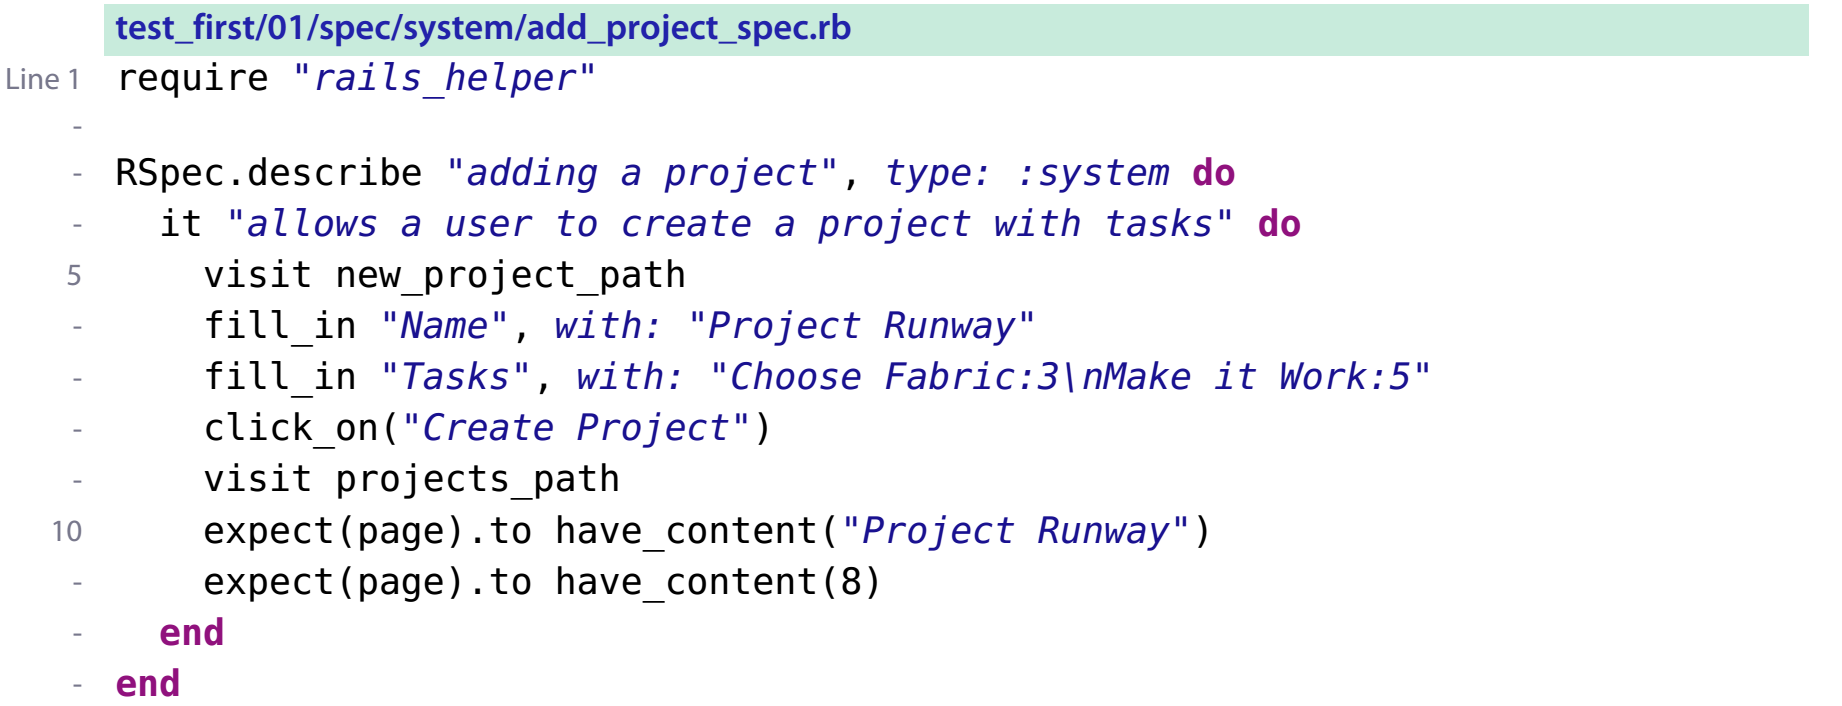
迅速地講解以上測試在做什麼:
首先,我們使用 Capybara 所提供的 visit 方法在 URL(new_project_path) 路徑上模擬對專案系統的請求。經由 visit 方法而抵達到該頁面後,fill_in 方法會將專案名稱 (“Project Runway”)和兩筆任務資料放置在對應的表單格內,然後 click_on 方法會按下有標記 “Create Project” 的按鈕。
最後在行數 10, 按下送出後會開始測試的評估階段,並將路徑轉至 projects_path,也就是任務列表頁面(新增後的任務都會呈現在此頁面)。
“Using Capybara allows you to simulate user activity for end-to-end tests of your Rails features.” ― Rails 5 Test Prescriptions ―
以上的測試就是ㄧ個合理的 end-to-end test,它模擬了任務資訊的填寫、送出以及部分的結果驗證。
我們可以從下列幾點得知像這樣的測試其實是很有價值的:
-
它不會對潛在程式碼的結構做假設。
-
它強迫你以使用者可見的行為來思考系統功能。雖然不是系統上所有的功能都有與使用者的面對面接觸,但如果該功能是需要有直接互動時,能夠獨立於 implementation 且清楚地說明正確行為是非常重要的。
-
最後單元測試將會聚焦在許多小部分你能夠管理的程式碼。能有ㄧ個測試來確認所有的小測試都可以通過,可以預防錯誤的產生。
Pending Tests
- 對 RSpec 來說,任何在 it 方法後面沒有接 block 的 spec 都是 “pending” 的狀態
it "bends steel in its bare hands" - 可以在 it 或是 describe 加入(:pending)為第二個引數,便可以讓狀態轉為 “pending”
it "bends steel in its bare hands", :pending do #anything end - 直接在 spec 中帶入 pending 方法
it "bends steel in its bare hands" do
  pending "not implemented yet"
end
如果你不要讓 RSpec 去驗證某個 spec,而是要跳過這個測試,就可以用 skip 來取代 pending。另一個更懶惰的方法是直接在 it 或是 describe 關鍵字前,加上 x 。 例如: xit 或是 xdescribe 就可以有同樣的效果。
Comments